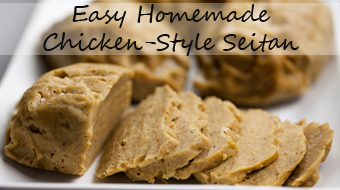
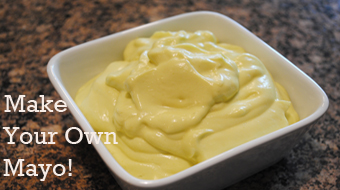
That Was Vegan?

Recipes so delicious you'll never think twice!

Happy Labor Day! Burger Round-Up

This weekend marks the unofficial end of summer, which will be celebrated by many a backyard BBQ. Below are a few vegan burger recipes for your consideration (and if you’re hosting said BBQ, check out my Guide To Vegan BBQ-ing!). Click on the pictures to get to the recipes.

Smoky-Sweet Chickpea Burgers with Adobo

Vegan smoky-sweet chickpea burger with adobo

These burgers, which are my absolute favorite, bring a whole mix of flavors to the (picnic) table: Sweet, smokey and spicy. If you’re a fan of chipotle peppers in adobo sauce (or are just game enough to add some heat to your plate), give these a try!

Spicy Chickpea Burgers

spicy vegan chickpea burger

I think these were my first ever homemade vegan burgers, so they’ll always hold a special place in my heart! Plus it’s easy to adjust the amount of heat: just adjust the amount of chili powder and thai chili sauce!

Green Chile Black Bean Burgers

Vegan Green Chile Blackbean Burger

Now is the perfect time of year to make a Green Chile burger! There are stands set up all over the place selling fresh-roasted chilies from Hatch, NM and I’ve even seen them sold (fresh!) in stores.

Asian-Style Tempeh Burger

Asian-Style Tempeh Burger

The only non-bean burger to make the list, this baby is perfect for your non-vegan guests who might turn their noses up at what they perceive to be a mushy burger substitute.  The flavors and textures are amazing, and a great addition to any grilling adventure!

Wherever you go and whatever you eat, here’s wishing you a safe and happy holiday weekend!

Grilled Apple Pie with Vanilla-Coconut Whipped Cream

Pssst! I announced the winner of the Fruitables Dog Treat Giveaway!

Vegan Grilled Apple Pie with Vanilla-Coconut Whipped Cream

Grilled Apple Pie with Vanilla-Coconut Whipped Cream

This recipe was actually my submission to One Green Planet this month, but I wanted to reshare to make sure no one missed it- it’s that good.

As summer winds down my thoughts begin to turn towards traditional autumn dishes like apple pie, only I’m not ready to turn on my oven yet (mid 90′s this week in Denver, WTF!?). What’s a girl to do? Well… turn to her best hot-weather-friend, of course- the grill!

These are the perfect alternative to the traditional over-baked dessert: Fun, handheld apple pies you can cook without heating up your kitchen! Delicious apple pie filling wrapped in spring rolls, grilled, and then brushed with melted vegan butter and sprinkled with cinnamon and sugar.  The only thing that could possibly make it better is the vanilla-infused whipped coconut cream that is just perfect for dipping.

Vegan Grilled Apple Pie with Vanilla-Coconut Whipped Cream


Grilled Apple Pie with Vanilla-Coconut Whipped Cream (Makes 10-12 rolls)

Ingredients (Apple Pie):

  • 6 large apples (Fuji apples work great), peeled and sliced
  • 1 1/3 cups water
  • 1 1/4 Tablespoons lemon juice
  • 1 cup sugar
  • 3 Tablespoons cornstarch
  • 3-4 pinches of sea salt
  • 2 teaspoons cinnamon
  • 1 teaspoon nutmeg
  • 20-24 spring roll wrappers, defrosted
  • Non-stick spray
  • 2-3 Tablespoons vegan butter, melted
  • 1/4 cup cinnamon sugar mix for sprinkling (this is approximate, you may need a little more/less)

Directions:

  1. In a sauce pan over medium heat, mix the apples, water, lemon juice, sugar, cornstarch and salt. Once the mixture begins to bubble, reduce heat to low-medium and cook for about 25 minutes stirring occasionally, or until the apples soften. The mixture isn’t going to cook inside of the spring rolls, so it’s important to give it plenty of time on the stove top. If the mixture gets too dry, add more water- you want it to be the same consistency as it would be inside of an already baked pie.
  2. If you’ve never worked with spring roll wrappers before, the key is to be gentle with them. Leave the package on the counter for at least an hour before you start to work with them, and keep a bowl of cold water and a paper towel near by as you start to separate them. As you’re pulling a wrapper away from the rest, squeeze the wet paper towel at the point of separation. You can even rub the paper towel back and forth to help the wrappers separate, and this should keep them from tearing. If you’re still having trouble, try separating them two at a time.
  3. Once the filling is ready, place the wrappers (2 at a time, doubled up) on a non-stick surface such as a cutting board with the points oriented up, down, left and right- like a diamond. Spoon 2 heaping spoonfuls (I used a soup spoon) onto the center of each. Grab the top point and fold it down to match up with the bottom, giving you an inverted triangle. Next take the two side points and fold them in towards each other. Finally, grab the bottom point and wrap it upwards and around the roll. As you finish, place each on a plate with the flap underneath the roll. If you need a picture, check out my buffalo tofu spring roll post.
  4. When you’re finished building the rolls, heat the grill to medium/ medium-low heat and spritz with a little non-stick spray. Place your rolls onto the grill (flap side down) and leave for about 5 minutes. Flip and leave on for another 5 minutes. You want grill marks but you don’t want them to burn! Brush the tops with melted butter and sprinkle with cinnamon-sugar, and serve with the vanilla-coconut whipped cream.

Ingredients (Vanilla-Coconut Whipped Cream):

  • 2 cans of full-fat coconut milk, unshaken and left in the fridge overnight (I used Thai Kitchen)
  • 3 teaspoons vanilla
  • 1 teaspoon sugar

Directions:

  1. Gently open the cans, and scrape just the white solid portion out of the first can, avoiding the liquid at the bottom, into a large bowl. For the second can you can pour the entire thing into the bowl, liquid and all. Add in the vanilla and sugar and beat with an electric mixer until fluffy! Note: If you want a stiffer cream, use 3 cans, only using the solid portions.

Enjoy!

Buffalo Chik’n (Soy Curls!) Spaghetti

Vegan Buffalo Chik'n Spaghetti with Soy Curls

Buffalo Chik’n Spaghetti with Soy Curls

Buffalo Chicken Soy Curl Spaghetti rocks! I realize that most vegans consider soy curls to be sooo 2011 (or something) but for me they’re brand new. I’ve read other blogger’s accounts of how wonderful and miraculous they are, but this was my first time trying them. For any other newbies out there wondering What Are Soy Curls?:

They’re dehydrated strips of soy protein made out of whole, non-GMO soybeans that are slowly cooked until they’re soft, then processed by a machine that breaks them into strands. Then they’re slowly dried at a low temperature and packaged. That’s it. No added fat or flour — just soybeans that have been transformed, leaving them high in fiber and omega-3 fatty acids, with 10 grams of protein in every serving.” from Oregon Live.

This means they’re a whole food, very different from most mock meats which are derived from isolated soy proteins and full of preservatives and added calories and fat! Plus they look/feel exactly like chicken. You simply soak them in warm water for 10 minutes to rehydrate, squeeze them, the prepare however you like.

I bought them at Nooch last week, but couldn’t decide what to make with them until I saw a very interesting (non-vegan) recipe on Pinterest for buffalo spaghetti. We already know I love Buffalo Tacos and Buffalo Spring Rolls, so why not spaghetti too?

The sauce, which features cream cheese and ranch dressing is super creamy with just the right amount of (adjustable!) buffalo heat and sticks to the pasta perfectly. And I think perhaps soy curls were invented with buffalo sauce in mind! Of course, I’m also anxious to try them in fajitas… and maybe a chik’n salad!??


Buffalo Chik’n Spaghetti with Soy Curls (2 servings)

Adapted from non-vegan recipe

The ingredients below will give you a mild buffalo flavor- give it a try and if you want to up the heat, just add more Franks!

Ingredients:

  • 6 ounces spaghetti
  • 2/3 cup soy curls
  • 1/4 cup ‘not chickn broth’ (or veggie broth of your choice)
  • 1/3 cup Franks buffalo sauce
  • 4 oz vegan cream cheese
  • 1/3 cup vegan ranch
  • Sea salt

Directions:

  1. Cook the pasta according to package directions, rinse with cold water and set aside.
  2. Place soy curls in bowl of warm water and let sit for 10 minutes, then squeeze out all excess moisture.
  3. In a medium sauce pan mix the broth, buffalo sauce, cream cheese and ranch over medium heat, stirring until the cream cheese melts. Taste and add more buffalo or sea salt as needed.
  4. Stir in soy curls and reduce heat to low. Wait a minute or two for the curls to soak up the sauce, then stir in the spaghetti. Once everything is warm, serve immediately.

Enjoy!

Fruitables Dog Treats… A Giveaway For Your Best Friend!

This giveaway is now closed, and the randomly-chosen winner is…  ammauceri! She has two pitbull mixes who are just gonna gobble these up :)   Have I ever mentioned what a soft spot I have for bully breeds? I think they’re just awesome dogs! So, ammauceri, email me (thatwasvegan (at) gmail (dot) com) with your address and which option you’d like!

For the rest of you- stay tuned, I’ll be back next with with ANOTHER GIVEAWAY! This one is meant for human consumption, is really sweet, and no bees were harmed in the making of it… and those are all the hints I’m giving you!

Please don’t let it ever be said that I play favorites with my human readers- clearly I value my doggie readers as well because this giveaway is ALL FOR THEM! Well, they may need your help entering, but you’ll be required to hand (paw?) the prize right over to them if you win!

I first discovered Fruitables about 6 months ago at my local Petco. I was on my usual pilgrimage for vegan kibble and I like to check out the selection of treats. Before Betty got sick I always baked their treats at home, but now that she can’t partake it doesn’t seem fair to fill the house with the wonderful scent of baking peanut butter. It’s not always easy to find vegan treats in the mainstream stores like petco and petsmart, so I usually end up annoyed- picking up package after package of treats that look healthy/interesting/vegan only to see “chicken stock” or something similar in the ingredients list.

Fruitables caught my eye with their amazing flavors, including Pumpkin Banana, Sweet Potato Pecan and Pumpkin Blueberry! I grabbed a bag and turned it over- all the ingredients  appeared vegan friendly with the possible exception of  “mixed tocopherols” which can be derived from either and plant or animal sources, but I tweeted the company and was promptly informed theirs were all plant-sourced. Perfect! I’m a huge fan of their ingredients- simple, vegan and healthy (example: Pumpkin Apple):

  • Pumpkin
  • Organic Oatmeal
  • Pearled Barley
  • Potatoes
  • Oat Fiber
  • Apples
  • Canola Oil
  • Brown Sugar
  • Cinnamon
  • Natural Flavor
  • Vanilla
  • Mixed Tocopherols

They’re also free of wheat, corn, soy and artificial ingredients, colors and preservatives! And if any of you have a portly dog (like I do) you’ll appreciate the fact that each treat has under 9 calores.

Pumpkin Cranberry was the first flavor I brought home. As soon as you open the bag you’re amazed by the smell- you’ll swear you’re holding fresh baked human cookies or muffins!

Dogs love these crunchy little treats and you’ll enjoy giving them to your furry little best friends because they’re healthy and vegan!

The Giveaway

One lucky reader, to be chosen from the comments below, is going to win a fabulous selection of Fruitables dog treats! The winner will get their choice of either:

  1. One bag each of all five flavors (Blueberry Pumpkin, Pumpkin Apple, Pumpkin Banana, Sweet Potato Pecan and Pumpkin Cranberry) (each bag contains ~90 treats) OR
  2. Two full-sized bags of your choice plus a selection of smaller pouches that you can share with friends, family or random strangers at the dog park :)

The contest is open until Midnight (Mountain time), Monday 8/27. The winner will be chosen randomly and announced the following day.

To Enter: All you gotta do is leave a comment below telling us about a special dog in your life- past or present. We all have a special doggy soul mate, and I want to hear about yours!

Want more than one chance to win? Go ahead and do any or all of the following, and leave a separate comment for each, letting me know you did it. (Multiples grouped into one comment will only count once!)


  • Follow TWV? on Twitter
  • Follow Fruitables on Twitter
  • Tweet about the giveaway (make sure you tag me!)
  • Like TWV? on FB
  • Like Fruitables on FB
  • Share the giveaway on your FB status

Good luck!!

*Fruitables provided me with free product to review, but the opinions are 100% mine!

Grilled Zucchini Boats and My New Favorite Store!

Vegan Grilled Zucchini Boats

Grilled Zucchini Boats

If this summer had an official food, it probably would’ve been these zucchini boats. While admittedly not the most exciting dish, they’re delicious, healthy, quick n’ easy to make and each boat has only ~85 calories!

Winner Winner Zucchini Dinner!

By grilling each side of the zucchini you get a wonderful texture- cooked yet still really firm.  We already know tomatoes and basil complement each other perfectly and Daiya… well, you know how much I love that vegan cheese! But you don’t need a lot- we’re not trying to make a pizza here, people.

Grilled Zucchini Boats

I made these A LOT this summer. Usually as a side dish, but sometimes I’d eat 2 boats and call it dinner. I even brought them to work, nuked them for about 45 seconds and called them breakfast!

Oh! Speaking of things I can’t get enough of, I went here yesterday:

If it was possible to date a store, Nooch would be my new boyfriend. This place is awesome- and they’re only on their ‘soft opening’ right now, which means it’ll be even MORE awesome once all their shelves are stocked! Can you imagine anything better than an ALL VEGAN store? I know other cities have these already, but here in Colorado we’re a little bit behind the (vegan) curve. But we’re catching up!

Reia and I got there yesterday at 2:00 when they opened (soft opening = unusual hours), and I was like a kid in a candy store! I grabbed a basket and immediately got to work. My haul included:

  • Soy curls
  • Biscoff
  • V-egg
  • Sea-salted caramels
  • Peanut butter cups
  • A Jokerz candy bar that is basically a vegan snickers, and
  • Teese mozzarella (mozzarella sticks, here I come!)

There was so much more I wanted to get, but I thought I should pace myself- especially since they’re adding more product over the next couple of weeks, so you know I’ll be back frequently. The best part was seeing all these vegan products that I’ve read about but never tried- like soy curls and Biscoff. BTW… Biscoff? Holy Monkey that stuff is good!

They also had products I didn’t even know existed- Tofurky and Field Roast HOT DOGS? Vegenaise in tons of different flavors, including pesto, chipotle, and tarter sauce, and there were 2 or 3 different kinds of boxed mac n’ cheese too! They also have a big cookbook section, some t-shirts and tons of vitamins.  All vegan! Yay! And everything was reasonably priced too- no more expensive than buying the same items at a regular grocery store or online from Amazon- and in some cases the prices at Nooch seemed lower.

Ok, I’m done gushing. Reia posted a full review, and she’s much better at those than I am. My forte is mostly just eating :)

Finally, just a heads up- we’re rushing to finish the house over the next few weeks so we can get it on the market by September, which means not much time for cooking or writing. I’ll still post, just not as much. Please don’t give up on me or think I’ve gone away for good because I haven’t. I love you guys too much for that!


Grilled Zucchini Boats (Makes 2 side servings)

Ingredients:

  • 1 medium/large zucchini, washed
  • ~1 Tablespoon of olive oil
  • S&P
  • 1 tomato
  • 4-5 fresh basil leaves
  • Daiya mozzarella shreds, about a handful

Directions:

  1. Heat grill to medium.
  2. Trim ends off zucchini and slice in half lengthwise. Use a spoon to gently scrape out the seeds from the center. Brush with just a little bit of olive oil and sprinkle with S&P.
  3. Place cut side down on the grill, leave for 6-8 minutes. You should have some grill marks.
  4. Slice the tomato, then cut the slices in half to make little half-moons (these fit perfectly on the zucchini). Place 2-3 on each zucchini, depending on size.
  5. Chiffonade the basil and layer on top of the tomatoes, then top with the Daiya. Sprinkle with S&P
  6. Turn grill heat to medium-low, and put zucchini back on. At this point I like to lay them in between the grates, rather than across, to help them stay upright. Close the cover and leave on for about 5 minutes or until the cheese starts to melt.

Enjoy!

Hot Weather Recipes: Grilled Caprese Quesadillas

Vegan Caprese Quesadillas

Grilled Caprese Quesadillas

I haven’t felt much like cooking lately… or writing. Or even reading other blogs. I just feel kind of blah. Maybe I need a vacation? Anyway, in keeping with my lazy theme, I have a simple, grilled quesadilla for you today. I was craving something gooey and cheesy, and these seemed like the perfect way to use some of the basil and tomatoes that are all growing so well now that it’s no longer a billion degrees outside! (It’s still warm enough, though, that I’d prefer not to use my oven if I don’t absolutely have to!)

As with all grilled quesadillas, fresh tortillas work best! Once they’re a little stale they tend to get a bit too crispy/hard when you grill them.


Grilled Caprese Quesadillas (Makes 2 quesadillas)

Ingredients:

  • 4 medium tortillas
  • Daiya mozzarella cheese
  • 2 medium tomatoes, sliced
  • 15-20 fresh basil leaves

Directions:

  1. Heat your grill to medium.
  2. Sprinkle some daiya onto two of the tortillas, then layer tomatoes, basil, and some more cheese. Top with other tortilla and place on the grill. Slide it around a bit so it doesn’t stick, then cover and leave on for about 4-5 minutes on each side.

Enjoy!

Hot Weather Recipes: Grilled “Cheesy Mac n’ Rib” Pizza

Vegan Cheesy Mac n' Rib Pizza

Cheesy Mac n’ Rib Pizza

By now you’re probably not surprised to see crazy pizzas here at That Was Vegan?… Maybe when you first read about my Korean Pizza with Kogi-Style BBQ Seitan and Sriracha Pineapples… or when you saw that I was going on and on about something called a Grilled BBQ Tater Tot Pizza you may have scratched your head, but not anymore. Now I bring you a pizza with bbq seitan and macaroni and cheese!

I’m expecting one of two reactions from you guys: You’re either going to avert your eyes while suppressing a giggle (you know, like we all do when we see that loud little kid who’s been running around the restaurant yelling for the last 10 minutes finally trip and totally eat it!? Or is that just me??) or you’re going to nod knowingly and say “Yes. Macaroni and cheese on a pizza. FINALLY!”

This pizza was inspired by a sandwich that I guess is pretty famous, in both its vegan and gross original versions- Do you remember American’s Top 10 Sandwiches Veganized? Great series and if you love sandwiches as much as I do, you should check it out. The one that really caught my eye was the Cheesy Mac n’ Rib, an ooey-gooey combination of mac n’ cheese, caramalized onions and BBQ seitan.

And not just any mac n’ cheese… my B’nut Squash Mac n’ Cheese! And lots of it ;)

Vegan Cheesy Mac n' Rib Pizza

I made this as a “mini” pizza, using about 1/4 of a package of store bought pizza dough, and that was more than enough for me for one meal. After all, there was also a whole mess of m-n-c on there too! It was also an ‘eat with both hands’ kind of thing. And not, you know, an ‘I’m on a diet’ kind of thing. Like, at all.

This is absolutely a ‘once in a while’ kind of pizza. Unless you’re trying to put on weight, in which case I recommend eating one of these a day, at least! Which reminds me, if I ever find a magic lamp and get three wishes, one is going to be that I need to consume 5,000 calories a day just to maintain my weight :)


Grilled “Cheesy Mac n’ Rib” Pizza (Makes 1 mini pizza)

If you need some pointers on how to properly caramelize onions, check out this and this. Having your mac n’ cheese and caramelized onions already warm or at least at room temperature will make the final cooking process go faster!

Ingredients:

  • 1/4 packaged  pizza dough, sitting at room temperature for at least 30 minutes
  • Olive oil
  • Cooking spray
  • 1 loaf seitan
  • 1/2 cup BBQ sauce
  • 1/8 cup caramelized onions
  • 1/3 cup Butternut Squash Mac n’ Cheese
  • Salt and Pepper

Directions:

  1. Slice the seitan into bite-sized pieces, and marinate in the bbq sauce for about an hour.
  2. Heat your grill to medium.
  3. Cut your dough into quarters and roll out with a pin to get it as thin as you want. Drizzle one side with olive oil and place the dough oil-side-down on the grill. Keep an eye on it, making sure the dough begins to cook and you get grill marks-but don’t let it burn. 5 minutes should be good.
  4. Remove the dough and place it on a plate with the cooked side UP.
  5. Spread about 2 tablespoons of bbq sauce onto the dough (use what you were marinating with), then top that with the marinated seitan. Spread the caramelized onions over the seitan, and then top with the m-n-c.
  6. Give the grill a quick squirt of cooking spray and place the pizza back on.  Close the grill and turn the heat down to low. Leave it on there until everything is warm and the m-n-c is nice and gooey, 7-8 minutes.

Enjoy!

Make Your Own Vegan Mayo!

Homemade Vegan Mayo

Homemade Vegan Mayo

I’ve been wanting to make my own vegan mayo at home for a while now. I love Vegenaise, I really do! It’s just a little pricey and the jars are smallish and don’t seem to last very long in my kitchen, especially during the summer when I’m making Spicy Pasta Salad and Tuno Salad and other yummy things.

There are a couple different recipes floating around out there. Some use tofu, some don’t. The one I tried, from Epicurvegan* doesn’t- it’s basically just EVOO and soy milk, if you can believe that! I did make some changes to it- I increased the amount of vinegar because me likes my mayo tangy, and I also added more sea salt.

My motivation for doing this was to save money. I was making a couple large batches of dishes that all required vegan mayo, and I just didn’t want to fork (ha ha!) over all that money for the brand name stuff. For me this was a very economical way to go because I had an enormous bottle of high quality EVOO leftover from the goodies Lucini Italia was kind enough to send me. Even purchasing the EVOO myself though, I still think this would be cheaper than buying Vegenaise….

The recipe makes about 3 cups, but you could halve it. I used mine up immediately, but the original recipe stated it would last about a week in the fridge.

*I’d love to link to the original recipe but the website has gone defunct :(   I even tweeted him about it, but got no response. Oh well.


Homemade Vegan Mayo (makes 3 cups)

Adapted from Epicurevegan

Ingredients:

  • 1 cup plain soy milk (not vanilla!)
  • 2 1/2 cups extra virgin olive oil (the higher the quality, the better results)
  • 2 tablespoons apple cider vinegar
  • 1/2 teaspoon dry mustard
  • 1 teaspoon sea salt, or more to taste
  • pinch of onion powder

Directions:

  1. Pour the soy milk into a blender, cover and turn on low. Remove the center cap from the cover and slowly pour the oil in. Continue to run the blender, frequently checking the consistency, until you’re satisfied. The longer you leave it in there, the thicker it’ll get.
  2. Spoon the mixture into a bowl and whisk in the remaining ingredients.
  3. Store in a tightly sealed jar for up to a week.

Enjoy!

Daiya’s Recipe Roundup… I did it AGAIN!

Daiya just released their monthly Recipe Roundup for July, and this month they were trying to stick with just the top 3… which became the top FOUR.
You’re thinking, okay… sooo? Well, the twist is that TWO of the four recipes are from yours truly! Sounds like a good excuse to open up a nice bottle of vegan wine :)

The lesson of the day is: The way to Daiya’s heart is definitely through their stomach, especially with QUESADILLAS! And baked rigatoni. And philly cheezsteak. Go check it out!

Vegan Sweet Potato & Black Bean Quesadillas

Sweet Potato & Black Bean Quesadillas

Vegan Grilled Cranberry Pistachio Quesadilla

Grilled Cranberry Pistachio Quesadillas

All I can say is THANK YOU DAIYA!


Strawberry-Coconut Bundt Cake… Perfect for Summer!

Vegan Strawberry Coconut Cake

Strawberry Coconut Cake

This is a play on my Blueberry-Coconut Bundt Cake… just a little bit more summery, if you will. The coconut is sweet (but just naturally- make sure you buy the unsweetened flakes!), and the cake is so moist. We enjoyed the first round of this cake on the back deck with a side of summer sunshine before I wrapped the leftovers up in foil and a zippy bag and stored it away in the freezer. It was in there for about 3 weeks I think, before I defrosted it just the other day, and it was still just as delicious. Neither the texture nor the flavors changed, so I think the next time I make this I’ll bake two and save one for a rainy day!

So, it’s Friday and I hope you all have a lovely weekend, but before I sign off I wanted to share this blurry adorable picture of Cooper- He had been rooting around under a bush looking for some (real or imaginary) bit of food, I guess… and when he came back in he had all this junk stuck to his little face. Poor guy, but pretty typical- the boy is an explorer at heart :)


Blueberry-Coconut Bundt Cake

Ingredients:

  • Bakers Joy (or other nonstick spray)
  • 1-1/3 cups granulated sugar
  • 2/3 cup vegetable oil
  • 1 13.5 oz can light coconut milk
  • ¼ cup So Delicious coconut milk (plus 4 T)
  • 3 t vanilla extract
  • 3 cups AP flour
  • 2 t baking soda
  • 1 t salt
  • 1 ½ cups shredded unsweetened coconut
  • 1 ½ cups fresh strawberries, rinsed, dried and sliced
  • Extra coconut flakes, for sprinkling (if desired- not necessary)

Directions:

  1. Spray inside of bundt pan with Baker’s Joy, and set aside.
  2. In a large bowl combine the sugar, vegetable oil, both kinds of coconut milk, and vanilla. Stir really well to get rid of any lumps.
  3. Stir the remaining dry ingredients (leaving out the blueberries and coconut flakes), a small amount at a time, into the mixture. Once well mixed, fold in the blueberries and coconut flakes.
  4. Pour into pan and bake for 50-55 minutes at 350 degrees or until a wooden skewer comes out clean (well, it may be stained blue if you stab a berry! Just make sure there’s no cake goo stuck to it)
  5. Allow to cool in the pan for 10-15 minutes, then remove from pan onto cooling rack. Once completely cooled you can sprinkle with coconut flakes if desired.

Enjoy!

Related Posts Plugin for WordPress, Blogger...