≡ Menu

Veggie Hummus Spread (or Dip!)

Vegan Veggie Hummus Spread (or Dip!) | www.thatwasvegan.com

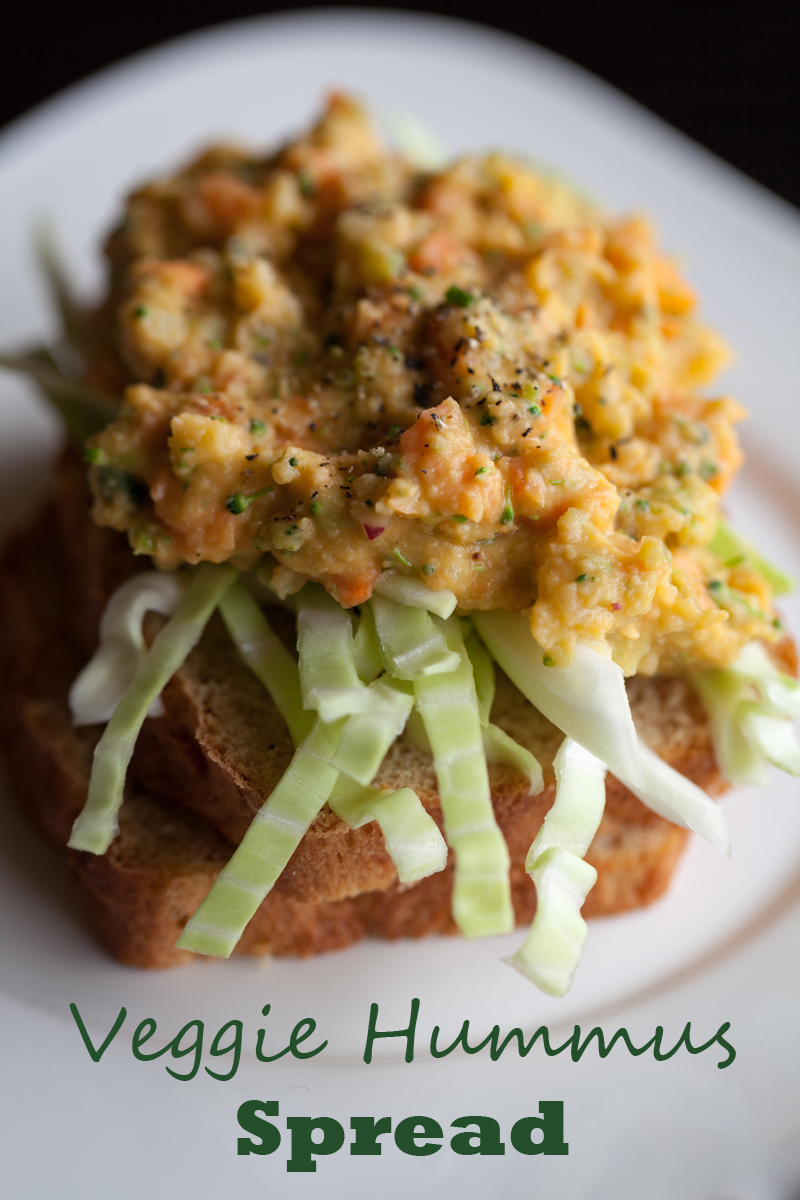
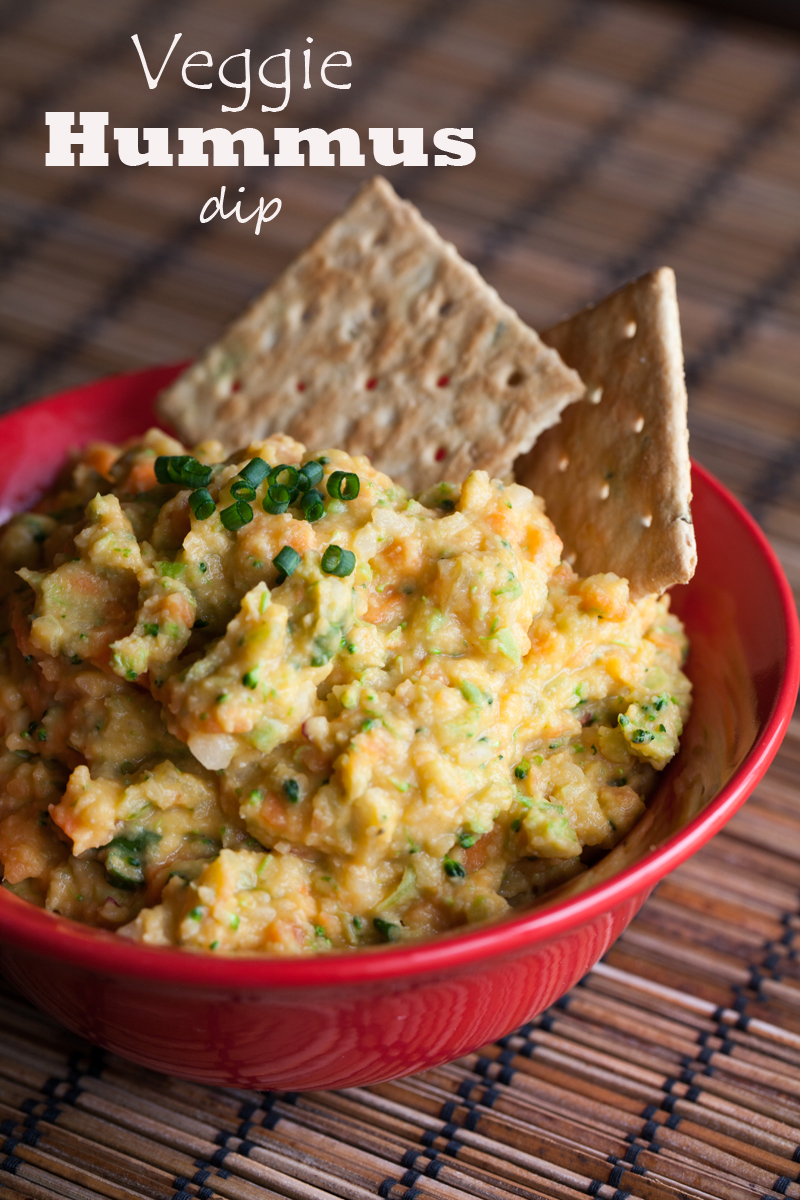
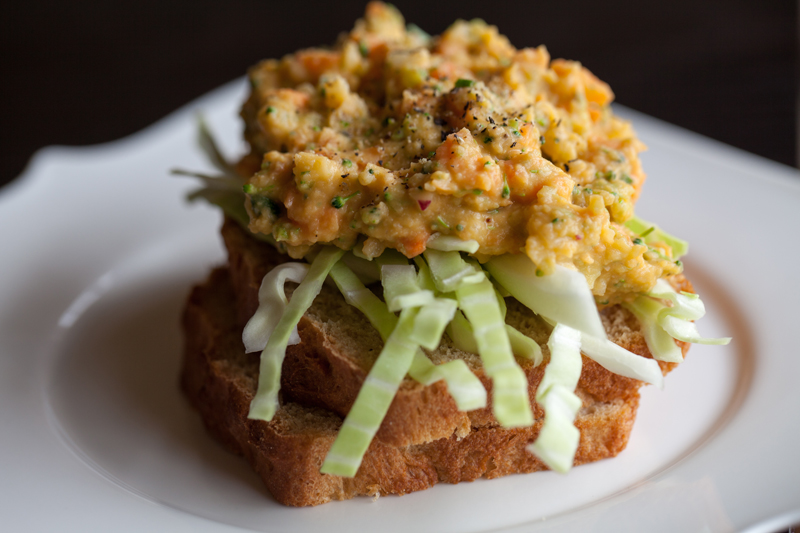
This Vegan Veggie Hummus Spread is the perfect filling for a lunchtime wrap, or even as a substitute for vegan mayo on your favorite sandwich. It also works fabulously as a dip, especially if you leave the veggies a bit chunkier.

This was actually inspired by a wrap my friend Cindy got from Trader Joe’s a while back. She shared it with me and neither of us could stop talking about how good it was.  I decided I needed something in my repertoire that would be that healthy and delicious AND that would be perfect for the summer. You know, those hot days when you don’t want to turn on the oven

Vegan Veggie Hummus Spread (or Dip!) | www.thatwasvegan.com

This spread/dip would also be great for picnics, or camping! Have I told you guys how much I love camping? Well, “camping”. As in, spending the weekend in a 24′ RV complete with beds, a couch, a stove, fridge and microwave, shower, etc…  I’ll take some pictures from our next trip to share. Even the little cocker dogs get in on the fun! They wear their cute little hoodies and run around off leash, it’s all very wild and outdoorsy, haha.

This sandwich, complete with some cancer-preventing cabbage would be delightful sitting outside in the sun after a long hike… with a G&T, of course!

Vegan Veggie Hummus Spread (or Dip!) | www.thatwasvegan.com

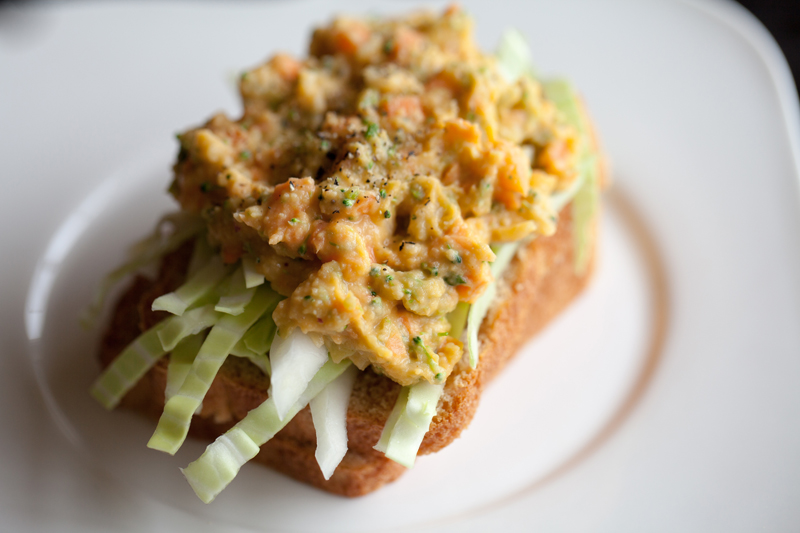
The best part about this recipe is that you can switch it up to include your favorite veggies. I used sweet potato in the hummus (along with the traditional chickpeas), and added radish, carrots, celery and broccoli to the mix. You could just go to your local farmer’s market and pick out your fave veggies and add those instead. And the recipe below includes homemade hummus, but you could totally cheat take a shortcut and use store-bought to save time.

Vegan Veggie Hummus Spread (or Dip!) | www.thatwasvegan.com

This is also the type of thing that’s great to make on a Sunday as you prep for the week. I like to take a tupperware full of it to leave in the fridge at work with carrot sticks for healthy mid-afternoon snacks. Yum.

Vegan Veggie Hummus Spread (or Dip!) | www.thatwasvegan.com


fd

Veggie Hummus Spread (or Dip!)
A delicious way to sneak in more veggies!
Write a review
Print
Ingredients
  1. 1 sweet potato, peeled and cubed (~1.5 cups)
  2. 1 can chickpeas, rinsed
  3. 1 tablespoon tahini
  4. 1 teaspoon cumin
  5. 1 teaspoon garlic
  6. 2 tablespoons olive oil
  7. 2 tablespoons lemon juice
  8. Salt to taste (I recommend a seasoned salt blend)
  9. 3/4 cup radish, washed and roughly chopped
  10. 2 carrots, washed and roughly chopped
  11. 2 stalks celery, washed and roughly chopped
  12. 1.5 cups broccoli, washed and roughly chopped
Instructions
  1. Boil potato until soft. Add to food processor along with chickpeas, tahini, oil and lemon juice and all seasonings. Pulse until very smooth, then scrape into mixing bowl.
  2. Add all veggies to the food processor, and pulse until the pieces are the desired size. When I'm serving as a dip I tend to leave them a little larger than when I'm putting them in a wrap or sandwich. Scrape into mixing bowl and combine with hummus. Refrigerate for at least an hour before serving - it allows the potato to cool completely, and really lets the flavors meld together!
That Was Vegan? https://www.thatwasvegan.com/
{ 8 comments }

Crunchy Potato Bites (and some new ink!)

Vegan Crunchy Potato Bites | www.thatwasvegan.com

Would you believe me if I told you I actually made these five months ago, and am just now getting around to sharing them? It’s true. I brought these to Jamie’s house for ThanksLiving last year. Shame on me for not sharing them with you guys sooner!

Speaking of things I want to share with you, I got a new tattoo on Saturday! Then, on Sunday I took it for a hike…

Vegan Crunchy Potato Bites | www.thatwasvegan.com

Do you see those teeny-tiny houses way down at the bottom right? That’s where we started. And this shot was taken only like halfway up the mountain.

So, what I’m saying in this: Not only do I have a neck tattoo, I also climb mountains. I am the most badass person you know! 🙂

Here’s the close-up of my new ink I shared on Instagram on Saturday, when it was brand new…

Vegan Crunchy Potato Bites | www.thatwasvegan.com

And just one more, an action shot!

Vegan Crunchy Potato Bites | www.thatwasvegan.com

 Can you tell I’m proud of my new ink?

Okay, so Crunchy Potato Balls!

Vegan Crunchy Potato Bites | www.thatwasvegan.com

They’re easy to make, and are a fun appetizer or finger food. You could dip them in plain ol’ ketchup or fancy it up a bit. I’m thinking a Sriracha-Ketchup would be delightful! They’re also good just on their own, honestly, sprinkled with some salt and pepper.

Vegan Crunchy Potato Bites | www.thatwasvegan.com


Crunchy Potato Bites
This might be the best use for leftover mashed potatoes EVER!
Write a review
Print
Ingredients
  1. 2 cups chilled, leftover mashed potatoes
  2. 1 cup shredded vegan cheese
  3. 1/4 cup vegan mayo
  4. 1 teaspoon dijon mustard
  5. 2 tablespoons AP flour
  6. 1 1/4 cups crushed corn flakes
  7. 1/4 cup sesame seeds
  8. S&P
Instructions
  1. Combine the potatoes, cheese, mayo, mustard and flour. Refrigerate for 1-2 hours.
  2. Combine the corn flakes and sesame seeds in a shallow dish. Shape the potato mixture into 1" balls, then roll in the corn flake mix. Place on baking sheet (use parchment paper for best results!), and sprinkle with S&P.
  3. Bake at 350 for 25-30 minutes, and serve hot with dipping sauce of choice.
Notes
  1. If you want to make these ahead, you can prep the balls and then freeze them!
Adapted from Taste of Home
That Was Vegan? https://www.thatwasvegan.com/
{ 10 comments }

Changing Your Outlook

Happy Monday! I’m sharing another of my Tofu U posts today, and if you enjoy it I hope you’ll head over to Nasoya’s awesome website and give it some love! I’m having a ton of fun coming up with recipes and other content for their Dean’s List… and I hope you guys are finding it helpful and interesting!


Changing Your Outlook | www.thatwasvegan.com

So here you are. You’ve decided to make changes to the way you eat. It could be for your health, or your love of animals. Maybe it’s at the behest of your physician, or perhaps it’s just the next step in your personal journey. No matter the reason, you’re facing quite a few changes. You’re trying all sorts of new foods, and probably missing some of your old favorites. Change can be scary, but while you can’t control everything, you absolutely can control your outlook!

***

 Don’t focus on what you can’t eat. Instead, enjoy all the amazing, delicious and healthful foods you can have!

You aren’t eating dairy anymore? You can still enjoy creamy sauces like Spicy Pumpkin Cream Sauce and Roasted Red Pepper Alfredo. Cutting back on the amount of meat in your diet? Why not treat yourself to someGreen Chile Beer Battered Tofuor a few slices of Sriracha-Agave Baked Tofu? There are endless numbers of healthy vegetarian and plant-based recipes out there, so keep trying until you find something you love.

***

 Don’t think about vegetables or tofu (or anything else!) as substitutes for the foods you’re no longer eating. They are delicious, enjoyable foods, not just replacements!

If you’re using tofu in a meal that you used to make with chicken, you shouldn’t expect it to taste the same, because it won’t. It can still be tasty and satisfying (and it’ll certainly be healthier!), but it will be different. And that’s okay! It’s not a substitute, remember? It’s an entirely different food.

***

 Be kind to yourself!

No one is perfect. No matter what your dietary goals are, give yourself time to adjust. I tried to go vegetarian no fewer than 4 times before it finally stuck, and I credit the success of my final attempt to going slowly and in stages. It’s okay to start with Meatless Mondays, and then continue to add plant-based meals into your rotation. It’s perfectly fine to set a series of smaller, more attainable goals. Meaningful change takes time.

No matter what your goals are or how you plan to accomplish them, you’ll need a positive attitude if you’re going to succeed. Focus on what you’re gaining by eating healthier, have fun trying new foods, and most importantly, go easy on yourself! Make changes at your own pace, and you’ll get to where you’re going before long!

{ 5 comments }

Mile High Vegan Eats: Phonatic

Do you love Pho? Are you a Pho-natic?

Mile High Vegan Eats: Phonatic

I am. I can’t get enough. When we were in Vietnam earlier this year I ate pho (or some variation of noodle soup) every day. Sometimes more than once a day. Now that I’m back in Denver I still want to eat it (although, a little less often), so I’m lucky to work so close to Phonatic. It’s considered by many to be the best pho in Denver. And I’m talking the best pho overall, not just the best vegetarian pho, so if you have meat-eating buddies who are down to slurp some soup, you should absolutely take them here.

What do I order? If I’m extra hungry, I start with the spring rolls:

Mile High Vegan Eats: Phonatic

Tofu, mint, basil… pretty standard Vietnamese spring rolls. Very tasty, but also very large. Even eating one could ruin your appetite!

My #1 dish here is the pho, obvs.

Mile High Vegan Eats: Phonatic

This is just a medium, and it’s enormous. I take the leftovers back to the office and reheat them for breakfast the next morning. No shame in my game! The tofu pho comes with vegetarian broth (although I always like to ask specifically for the veg broth because I’m kind of a nervous nellie. If you know me in IRL this doesn’t surprise you. I’ve been accused of channeling Meg Ryan in When Harry Met Sally when I order a meal…)

The tofu is springy and the broth is flavorful. I like to spice mine up with a bit of Sriracha (but not too much!), and I swear I could eat that thai basil straight!

Once in a while I’ll switch it up and order the Noodle Bowl. The tofu in there is insanely delicious, and there are tons of veggies in there: cucumbers, daikon and carrots to name a few.

Mile High Vegan Eats: Phonatic

There’s also a tofu rice bowl you can get, where the tofu is the same as the noodle bowl, but I haven’t tried that one yet.

Want more Denver-area restaurant reviews? Check out my Mile High Vegan Eats page!

{ 6 comments }

Coconut Roasted Sweet Potatoes

Coconut Roasted Sweet Potatoes | www.thatwasvegan.com

I hope you’re not sick of sweet potatos yet, because I have another one for you: Coconut Roasted Sweet Potatoes! They’re easy yet fancy, and would make a perfect side dish for any holiday or family meal. Ooh, you should make these for Easter dinner! I don’t celebrate Easter. Growing up it was all about chocolate and jelly beans in my house, and then my mom would make ham for dinner. And since I didn’t even start liking chocolate (except white!) until I was in my 20’s, it really wasn’t my favorite holiday. Isn’t it weird that I didn’t like chocolate growing up? I also didn’t like salt… then one day, when I was 24 or 25, I started liking both. Is that normal? I’m going to just go ahead and assume it is. But enough about me, let’s focus on these:

Coconut Roasted Sweet Potatoes | www.thatwasvegan.com

Cinnamon and coconut are the secret ingredients here.  I also used coconut oil, which I usually only use when I make dog treats. But I figured since I was already putting shredded coconut in the dish, might as well go all in.

Coconut Roasted Sweet Potatoes | www.thatwasvegan.com

So go ahead and pin these, and put them on the menu for your next big dinner. And if you’re into sweet potatoes, check out some of my other yummy sweet tater recipes!

Coconut Roasted Sweet Potatoes | www.thatwasvegan.com  

 The recipe is a (slight) adaptation from Gena Hamshaw’s dish on Food52. When you’re mixing the potatoes with the coconut oil, add 1/2 teaspoon of lime juice and 1 teaspoon of cinnamon. When they’re done baking, give another couple shakes of cinnamon and top with 1/4 cup shredded coconut. Yay!

{ 5 comments }

Spicy Pepperjack Chick’n Pizza

Vegan Spicy Pepperjack Chick'n Pizza | www.thatwasvegan.com

This pizza was amazing. You’ll eat the whole thing yourself, and it will be your dirty secret.

Or, maybe you’re like me: You eat the entire thing yourself and then blog about it to the entire world! No, no, I’m just kidding. I didn’t eat the whole pizza, I swear!

Vegan Spicy Pepperjack Chick'n Pizza | www.thatwasvegan.com

I wanted to, though.

I’m no wine connoisseur, but this pizza pairs perfectly with a crisp chardonnay! Kind of classy, right? You could absolutely make this pizza for someone special, chill a bottle of something special, and have a very romantic evening at home.

The Daiya Pepperjack shreds I used on this pizza were just perfect.  We all know how well Daiya melts, so the fact that it got all ooey-gooey was not a surprise. This time it was the flavor, that little kick, that took this pizza to the next level.

And the soy curls? Wonderful. I think they’re a great chicken substitute, but of course also have to stick in a plug for my chicken-style seitan, haha.  And I don’t want to make all those beautiful veggies feel left out, they were delicious too! My favorite pizza dough held it all together quite nicely.

Vegan Spicy Pepperjack Chick'n Pizza | www.thatwasvegan.com

If pepperjack isn’t your thing, try one of my other pizzas! Maybe a Thai Chick’n or Butternut Squash & Crispy Sage pizza is more up your alley. Or, if that someone special is sleeping over <wink, wink>, make them a Breakfast Pizza! You can see all my pizza recipes here.

Vegan Spicy Pepperjack Chick'n Pizza | www.thatwasvegan.com


Spicy Pepperjack Chick'n Pizza
Yields 1
Your *new* favorite pizza!
Write a review
Print
Ingredients
  1. One batch pizza dough
  2. 1 cup dried soy curls
  3. 1 small sweet onion, chopped
  4. 2 bell peppers, chopped
  5. 1/2 cup salsa, the chunkier the better
  6. 1.5 cups Daiya shredded Pepperjack cheese
  7. Crushed red pepper
  8. S&P
Instructions
  1. Soak the soy curls in warm water for 10 minutes. When they're done, drain the water and squeeze out as much liquid as you can. Roughly chop them, then set aside.
  2. Water saute the onion and bell peppers for 4-5 minutes, until they're tender-but-still-a-little-crisp. Remove from heat. Stir in salsa and chopped soy curls.
  3. Roll out the dough and place on pizza stone. Spread the salsa mixture evenly over the dough, then top with the Daiya cheese. Add S&P and crushed red pepper to taste.
  4. Bake at 425 until the cheese melts, ~12-15 minutes.
Notes
  1. If you usually enjoy a "saucy" pizza, add a bit more salsa for that extra moisture!
That Was Vegan? https://www.thatwasvegan.com/
{ 6 comments }

Seitan Chingalingas

Seitan Chingalingas | www.thatwasvegan.com

As I’ve mentioned quite a few times, I grew up in New Hampshire, which is *not* known for it’s authentic Mexican food. Like, at all. We had Taco Bell and we had a chain called Shorty’s. Shorty’s was my family’s restaurant of choice when we’d leave our small little town (home to a McDonald’s, a Chinese restaurant, and one or two pizza places) and venture to the relatively enormous cities of Concord or Manchester. My absolute favorite thing to order there were Chicken Chingalingas. I know, you’re shaking your head and saying “That’s not a real thing!” (unless you’re from NH too), but I swear they are. In fact, 15+ years later, they’re still on their menu:

Chingalingas: Flour tortillas filled with your choice of shredded meat or grilled veggies. Served with our homemade guacamole dressing. $8.99

Seitan Chingalingas | www.thatwasvegan.com

I googled “chingalinga” and then laughed out loud… the top hit was from another restaurant in NH that also serves them! Perhaps they’re a NH-only thing, because as soon as I left for California, I never saw them again. Well, except when I’d visit my family and we’d go to Shorty’s.

Seitan Chingalingas | www.thatwasvegan.com

They were basically miniature chimichangas, rolled up and fried. There’s probably an actual name for them, but to me they’ll always be Chingalingas.

Seitan Chingalingas | www.thatwasvegan.com

And now, I give you my version, the Vegan Seitan Chingalinga!


Seitan Chingalingas
Yields 10
The best Mexican appetizer you've never heard of!
Write a review
Print
Ingredients
  1. 1 loaf homemade chicken-style seitan
  2. 1 bell pepper (or half red and green), diced
  3. 1 onion, diced
  4. 1/2 teaspoon cumin
  5. 1/3 cup of your favorite salsa
  6. 1/2 cup vegan shredded cheddar
  7. 1/2 cup prepared rice (I used a Mexi-style rice, but you could also just use brown- although I'd season it first!)
  8. S&P to taste
  9. 10-12 small fajita-sized flour tortillas
  10. Salsa, guacamole or sour cream for dipping!
Instructions
  1. Dice your seitan and fry it with a bit of non-stick spray for 3-4 minutes until it gets a little crispy. Set aside.
  2. Water saute the veggies with the cumin 5-6 minutes. You still want them to have a bit of "bite", and not be too soft. Add the seitan back into the pan, along with the salsa, cheese and rice.
  3. Continue to heat over low until everything is warmed through. Lay out your tortillas and fill each with ~1/4 cup of the filling, and roll.
  4. Spritz with non-stick spray and bake at 400 for 8-10 minutes, until they start to brown. Flip, spritz and put under the broiler to brown the other side, just for a minute or so. Best served warm!
Notes
  1. Serve 2-3 per person with a side of rice and a nice salad, and you have dinner!
That Was Vegan? https://www.thatwasvegan.com/
{ 5 comments }

Zouq!

Zouq review | www.thatwasvegan.com

Have you heard of Zouq?  I hadn’t until they emailed me, which makes sense I guess because their products are (for now at least) only in stores in the LA area. The good news is that the rest of us can order them online!

Their South Asian snacks, which are gluten-free, msg-free, and cholesterol-free come in four flavors: Fiery Sticks, Golden Lentils, Jubilee Mix and Curry Crunch.

The first one I opened (and also my favorite) was the Curry Crunch. It was a little bit sweet and full of curry flavor. It also had the best mixture of pieces, I thought. Rice flakes, crunchy chickpeas, green peas, and loads of other little bites.

Next I tore into the Jubilee Mix. Like the curry flavor, lots of different pieces and textures going on in there. There were even raisins!

The Fiery Sticks were a little hard for me to get into, all I could really taste was “hot”.  I thought I was going to love them because they reminded me of the potato sticks I used to eat as a kid, but they were just too spicy for me. If you’re a heat-lover though, these would be perfect for you!

Finally we have the Golden Lentils which were tasty, crunchy little guys, and were perfect for pouring directly into your mouth, ha ha.

Overall, I was really happy with my Zouq snacks. If I were to order more, I’d definitely go with the Curry Crunch or the Jubilee Mix. I liked how they had a real variety of shapes and sizes, many of which were large enough for me to pull out one at a time, which is the way I tend to snack.

{ 2 comments }

Easy Bruschettini

Easy Bruschettini | www.thatwasvegan.com

Find yourself needing a quick yet impressive appetizer or finger food? Easy Vegan Bruschettini to the rescue! I was at my local sprouts doing my weekly shop on a Saturday afternoon, and happened upon an Asturi Bruschettini display case. I immediately knew that I needed a nice nosh and a glass of wine when I got home, so I grabbed a package of their Olive Oil flavor and threw it in my cart. But what was I going to put on them?

Easy Bruschettini | www.thatwasvegan.com

Hummus sounded great (as it always does!) but I wanted something fancier than just dipping, so I also grabbed a couple perfectly ripe roma tomatoes and some basil. Well, actually an entire basil plant that I planned to pot as soon as I got home (spoiler alert: it’s dead), and called it a day.

Easy Bruschettini | www.thatwasvegan.com

Again, not entirely true. I finished my grocery shopping first. I’m not such a lush that as soon as I think of wine and snacks I forget where I am and what I’m doing! Well, not usually anyway, haha! Oh, and the plates I used for showing off my faboo little creation? These are my fine china (she says with her pinky sticking up), I inherited them from my Grandma Barbara who I am obviously named after. She died when I was in high school, and my dad held on to them for me until I was old enough to appreciate them. And, you know, to need plates. Excuse me, I mean fine china

Easy Bruschettini | www.thatwasvegan.com

I just love the delicate little pink flowers and green leaves! Of course, as it turns out this was Grandma’s least fancy set of china. I learned from some of my Aunties a while back that it came from a grocery store promotion, where each week you could collect a different piece. Which is pretty funny, because it’s still the fanciest set of dishes I ever have or probably ever will own!

Mostly, I think they’re a really nice way for me to stay connected to my Grandma and my Dad, both of whom are gone now. Every time I pull out one of these plates I think of them and smile.

Easy Bruschettini | www.thatwasvegan.com

This hardly needs a recipe, but just in case, here it is!


Easy Bruschettini
Yields 18
Last minute guests? Serve them a finger food that's sure to impress!
Write a review
Print
Prep Time
10 min
Total Time
10 min
Prep Time
10 min
Total Time
10 min
Ingredients
  1. 18 crisps (I used Asturi Bruschettini)
  2. 2 roma tomatoes, diced
  3. 8-9 large basil leaves, cut in chiffonade
  4. Your favorite hummus (I used Sprouts garlic flavor)
Instructions
  1. Top each crisp with one-ish tablespoons of hummus, then layer with the tomatoes and basil. Does it get any easier than that?
Notes
  1. These can sit for a little while, but if you make them too far ahead you risk the hummus turning your crisps soggy!
That Was Vegan? https://www.thatwasvegan.com/
{ 4 comments }

To Press or Not to Press?

Hey guys! Today I’m sharing another one of my posts from Nasoya’s Tofu U! As a member of the Dean’s List I have the honor of sharing some of my tofu knowledge with all the wonderful people out there who are just starting to dip their toes in the world of tofu, and that’s how I came up with the idea for this particular post. Tofu can seem overwhelming the first time you open up that little pack and see all the water in there, right? In the comments, please share YOUR favorite tofu hints and tricks!

Do I Really Need To Press My Tofu? | www.thatwasvegan.com

“Do I really need to press my tofu?”

The answer to this age-old question is… Maybe. I usually press mine, and for me it’s worth the time and effort because I enjoy a really dense tofu when I’m frying or baking it. It really depends on how you’re planning to prepare the tofu, and what sort of consistency you’re after. Every type of recipe is different, so let’s break it down, shall we?

I’m using soft or silken tofu in a sauce… Do I really need to press it? Nope! I would just drain it completely and then get down to business. Whether you’re blending or simply stirring the tofu into your sauce, that extra liquid shouldn’t be an issue. Of course, if the recipe you’re following specifically instructs you to press it, you should press it.

I’m using soft or firm tofu in a cold dish… Do I really need to press it? This one depends. If you’re just cubing it and adding it to a salad or soup, then no you don’t. Draining the tofu will be enough. If you’re planning to marinate the tofu, however, I’d definitely recommend pressing it first. That allows it to soak up more of your delicious marinade!

I’m using firm or extra firm tofu in a stir-fry or recipe that calls for frying or baking the tofu… Do I really need to press it? Yes, you do, especially if you’re going for a springy tofu that’s crispy on the outside. Simply draining and patting the tofu dry wont do the trick. Which leads to your next question…

How do I press the tofu, and for how long? There are multiple tofu presses on the market, each with a different design and price point.  I’ve read both good and bad reviews about all of them, and all can be purchased online. If you’re hesitant to add to your kitchen equipment collection, there are other pressing options. The most popular (and the one I used for more than a year before I finally bought a press) is to wrap the block of tofu in a clean towel and place on a large plate. Cover with another plate (inverted so the flat side is against the tofu, then stack some  nice heavy books on top. I would use 2 or 3 sturdy books, then top those with my tea kettle. If you’d rather just use books, stack as many heavy ones on there as you can without them toppling over. It’s important to make sure nothing tips, you don’t want a mess to clean up! If you want a soft-ish tofu (or are in a rush), pressing for 10-15 minutes will work, but if you want that crisp n’ springy tofu we discussed earlier, you’re going to want to go for longer… 30 minutes at least. If you do buy a press, I recommend putting the tofu into it in the morning and leaving it in your fridge all day. That way, when you’re ready to make dinner, you have some seriously dense tofu that’s ready to soak up crazy amounts of marinade!

Of course these aren’t hard and fast rules, and the more you work with tofu the more you’ll realize what works best for you. Whichever method you go with, good luck and happy pressing!

Related Posts Plugin for WordPress, Blogger...
{ 4 comments }
Social media & sharing icons powered by UltimatelySocial